Sunday, May 27, 2012

Pink Fragipani Flowers

Happy Memorial Day Weekend! To start the summer off, I thought I'd post some tropical flowers. These beauties are named Fragipani.  :) You might know these flowers as Hawaiian Leis.


Friday, May 25, 2012

Coconut Leaves

Coconut Leaves home fragrance oil by Slatkin & Co. smells summery and fun. I was expecting the scent to be earthy and natural. I guess the word "leaves" in the name led me to believe that. Instead, I found it almost smells like a pina colada. For some reason, I'm not just smelling coconut here but also pineapple. Am I crazy? Maybe so, but I like that it smells like a tropical vacation.


Monday, May 21, 2012

Wild White Yard Flowers

Here are some flowers growing wild outside. I even included a simple dandelion because I captured a fun angle on camera.  Which white flower is your favorite here? Leave me a comment and let me know.


From above


Saturday, May 19, 2012

Scotch Tape Nails with Upside-Down Triangles


1st Day Bottom Coat
A glance at the process in-action

My first attempt at Scotch Tape Nails went pretty well! I have to say that the photos are less forgiving than what the naked eye could see- I swear all the mistakes weren't nearly as visible in person as in some of these photos. I know the process of scotch tape nails may seem difficult but I promise that it was surprisingly easy and really didn't take much time at all.

First, I painted my nails with Re-Fresh Mint by China Glaze. I waited until the next day to paint the scotch tape design. I had heard that by waiting a day, you'll be able to use the scotch tape without removing any of the original nail polish color accidentally. For my Day Two design, I used Black Satin by Rimmel London and #49 by King Maxim Nails.

Scotch Tape Step 1: apply scotch tape to nails
To begin the scotch tape process, I just used small pieces of tape. I placed each piece down one at a time. By using two pieces of tape, I aimed to make a triangular shape. Every "triangle" wasn't exactly the same- the angles can be different, therefore making different triangles. I tried to make them pretty similar though.

Scotch Tape Step 2: paint 2nd polish color over tape
Scotch Tape Step 3: remove scotch tape from nail
Once the scotch tape was in place, I rubbed the tape to secure it to my nail. Then, I painted the nail polish over my nail, overlapping with the tape to make sure the triangle shape was filled to the lines with polish. I lifted the scotch tape off my nail almost immediately after painting on the new polish.

Within painting each triangle, I did the taping process one nail at a time. This way, there wasn't enough time for the new paint to dry onto the scotch tape and get stuck. Once I lifted the scotch tape off my nail, I placed in onto a paper towel so that I wouldn't make a mess. After every nail was done, I let them dry for a very long time before placing a clear top coat over the finished product.

Cool, right?


Final Results of Scotch Tape Nails with Upside-Down Triangles:


Thursday, May 17, 2012

Hawaiian Pineapple Cilantro

Hawaiian Pineapple Cilantro home fragrance wax cubes by Better Homes and Gardens is a very tangy fragrance! It smells fresh, fruity, tangy, and tart all at once. I can't totally pick up on the cilantro scent, but I could tell there was something there beyond just your typically pineapple. This is another scent that really lingered the day after I burned it. Yum!

Tuesday, May 15, 2012

Single Pink and Purple Roses

I think these photos are my favorite yet. The beautiful purple rose and pink rose are just stunning. I suggest that you click on the photos to enlarge them because the blog size doesn't capture the full beauty. Enlarge, enlarge, enlarge!


Sunday, May 13, 2012

Deco Corners Nail Tattoo Stickers


While I'm not artistic enough to do free-hand designs, I still wanted to achieve the look. So, I've been exploring different nail stickers online and thought I would try some out. This week I tried Nail Tattoo Stickers by Miss Nail Cosmetics. I went with the Deco Corners design which has tiny circles of different sizes and designs all placed together.


In each pack, you receive a big strip of stickers, as you can see in my pictures. You just need to cut out the design for each nail. I found cutting the sticker to a smaller size made it easier. Once I cut the proper size for my nail, I used a tweezer to peel the sticker
off of its backing. I found that starting at one corner made it easier to pull off.

Now for the tricky part. You need to place the sticker onto your nail, but while you're holding the sticker it tends to curl up! You'll also need to ensure that you place the sticker onto the correct part of your nail. You'll also want to avoid making it crooked. I tried to place each sticker slightly lower than the end tip of each nail. This way, I could still have a small line of white tip on the edge of each nail.

Right hand
Placing the stickers onto my nails got easier as I went along. I guess practice makes perfect. Some of them bunched up and I had to peel them off and reapply. I even placed one on upside down by accident. Can you spot it on my right hand?

Once finished, I applied a clear top coat. Without the top coat, my nails looked very dull. This added sheen but was also needed to secure the stickers.

Left hand
The top coat smoothes things over a bit too. You can sort of see the square shape of the stickers on my nails in the close-up photos, but in person it's not really noticeable at all. I do have to say that the stickers started to peel a bit, despite having the top coat on. The day after I applied the stickers, my hot shower seemed to make them want to detach. After the shower, I pressed the stickers down firmly onto my nails. This seemed to help, as the peeling didn't start happening until 3-4 days later. I'm on day five now and some are chipping and peeling while some are still intact. It's a pretty decent process I guess! Not the longest lasting, but still pretty to look at.

Without top coat
With top coat


End Results of Deco Corner Nail Tattoo Stickers:


Friday, May 11, 2012

Coconut Sun

This home fragrance by ScentSationals is so great. By now you know that I love fragrance wax cubes. This fragrance is called Coconut Sun. These packages come with 6 cubes and you an re-use them a few times before the fragrance runs out.


Coconut Sun smells really fruity and tropical. It was fragrant enough for us to really notice it throughout the night and even from other rooms. It almost smelled beachy and clearly smelled like summer. It wasn't just 'coconut' - it had the extra steamy, sweet scent. I think the name Coconut Sun is perfect for this fragrance cube!

Tuesday, May 8, 2012

Dot Nails

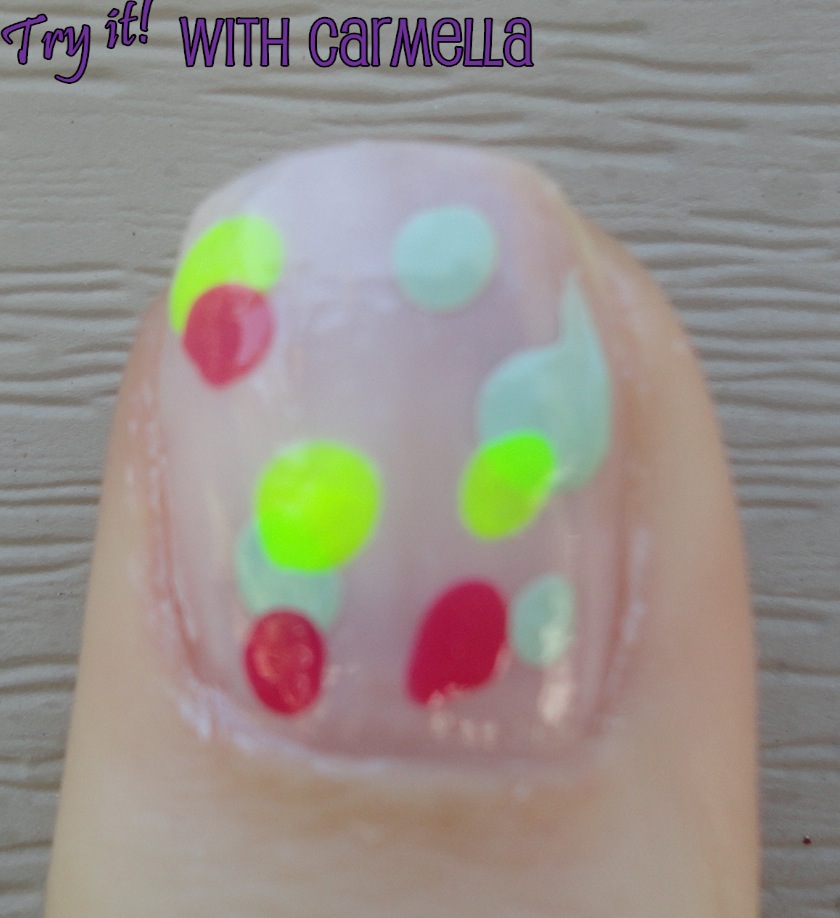
I've been reading a lot about nail designs done with dotting tools. I really like the actual layered-dotted look, rather than the polka dots.

I wanted to try painting layered dots onto my nails, but it wound up looking more like regular dots. I did layer some dots, but not in the way I really planned to. Next time, I'll have to try a more specific design- perhaps one that borders one corner of each nail! I think if all the dots were in one area of the nail, it would look cool!


Bobby pins dipped in nail polish
If you are like me, you may be wondering, what is a dotting tool? I certainly didn't know! I don't even own an actual dotting tool. I imagine you can really use anything with a rounded tip... a paint brush, toothpick, end of a toothbrush, etc.

 I used bobby pins! I simply bent one side of each bobby pin (to avoid making 2 dots at once). Once I bent the bobby pin, I stuck the bent end into my nail polish bottle. Once the pin was covered with nail polish, I just touched the tip onto my nail.

I found that being a bit more liberal with the amount of nail polish resulted in a better dot. I let each color dry before I applied a new color of dots. As you can see, I wasn't too patient in letting them dry and a few of the dots got smudged.

You can see my process of layers per each color here:

Step ONE
Step TWO 
Step THREE


Monday, May 7, 2012

Flower Bundle

Check out this flower bundle! It has a lot of different flower types in it. Although some leaves were drooping, I just cut those off and threw them out. I was still left with great flowers.  This bundle was just $3.99 from ShopRite. Which type of flower is your favorite in this bunch? Let me know.  :)