Monday, April 30, 2012

Sponge Nails


I just tried Sponge Nails! My friend saw this idea online and I was intrigued! My first attempt at Sponge Nails went pretty well. I do have to say, the edges of my nails started to chip pretty early on. I'm not sure if this was because of the polish brand quality or because of the technique used, but the color started to go away pretty early on.  However, it was really easy and looked very clean for the first few days. It got a lot of compliments too. This technique does not take a lot of skill, so it's easy to try!

You can use as many colors as you'd like, but I painted a white base coat and then used 3 colors for the sponge: Last Chance by Sinful Colors, Metallica by Wet'n'Wild, and This Is It by Sinful Colors. The silver was almost invisible at first glance, but it's there! You can also place the lines in other directions- diagonally, horizontally, or vertically- for totally different looks.


How To:

I took a make-up applicator sponge and cut it with scissor so that one piece was roughly the size of my nails and another piece was roughly the size of my thumb nails. Then, I took my 3 nail polish colors and unscrewed the tops. Then, I just painted lines of each color onto the sponge. I did a few layers of nail polish for each color so that the paint was pretty thick on the sponge.

Once the nail polish was applied to the sponge, I just stamped the sponge onto my nail. I also tried rolling the sponge onto my nail from one side to the other. Both ideas worked for almost the same result. I could also stamp the sponge over the first try of the application to fix any spots on the nail I missed or to blend things more between the change-over of colors. I had to reapply the polish onto the sponge for each new nail.


 I sort of liked blending the colors for more of an ombre look instead of strict, harsh lines separating each color. It gave my nails a cool look where the colors were prettier. Placing the dark color on the tip of the nail also made my nails look a bit like I had actual tips on them. At a glance, it looked like a reverse French manicure.

This process was fast and easy and I would definitely try it again with other color combinations and other directions of the nail polish placement.

Saturday, April 28, 2012

Strawberry Vanilla Cake and Cupcakes

I baked up a sweet combo dessert. I used Pillsbury Strawberry Moist Supreme cake mix with Vanilla icing. First, I baked the mix into mini-cupcake shapes. To make a mini-cake I used a small cooking pot!  This cake mix actually comes with pudding in it, so I must say it was very thick.


Mini-cupcakes and Cooking-pot Cake once Baked

Once the cakes cooled off, I iced them with the Vanilla icing.  In the meanwhile, I put aside any cupcakes that did not hold a full shape or that got messed up when I was taking them out of the baking pan.  Once iced, I took the leftover cake and moved the pieces between my fingers to create crumbs. Then, I sprinkled the crumbs over top the cake and cupcakes for a cute pink decoration!


I added Strawberry Twizzler's strings on top of a few of the cupcakes.


Sooo good! Loved the strawberry taste. I recommend this combo of baking products for sure!


Friday, April 27, 2012

One Month

Today marks one month since I started this blog! I still have so much to learn but it's been fun posting! Thank you to any friends and family who visit regularly to check out new posts.

Thanks to any other bloggers and internet users who visit. Leave me a comment so that I know you came! I think it's really interesting to see my stats and see where people are located and what sites my traffic comes from- but I'm still always really curious as to who is reading!

Thursday, April 26, 2012

Fluffy Towels

The fragrance oil Fluffy Towels by Yankee Candle is soooo good! The scent is pretty strong and fills the air with a fresh and clean aroma. I noticed it really does linger once the burning is over as well. I can notice the scent a little the next day as well. 

The name is also pretty accurate because it does smell like clean linens basically! Some home fragrances that are named fresh linens or clean towels smell sort of like chemicals or have a fake touch to it... but this one really does smell nice.  When I walk into a room with Fluffy Towels burning, it just smells clean and fresh.

I've been lighting this one every night lately! It's a nice alternative to fruity or other specific scents. This is just CLEAN.


Tuesday, April 24, 2012

Red Water Marbled Nails

After my recent first attempt at water marbled nails (read my full instructions on the process
by clicking here ), I've been dying to try it again and again. For my 2nd attempt, I used OPI 'Feelin' Hot-Hot-Hot', NYC French White Tip, & Sally Hansen Berry Sweet.


 Again, I thought the water marbling process was fun and way easier than I thought it'd be. Here were my results:


The close-up look is still a bit messy because I clearly haven't mastered water marbling just yet. I tried to get specific water marbling designs on my nail, but I still couldn't quite figure that out.  But the general look of it is awesome!

Sunday, April 22, 2012

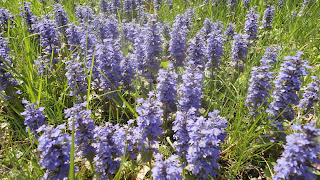
Wild Flowers

Does anyone know what type of flower this is? They grow wild in the grass. I found them in my parents' backyard.

Wild purple flowers are pretty!


Friday, April 20, 2012

Fragrance Burners

Clearly, I have a deep obsession with fragrance oils and waxes, which also means I'm obsessed with fragrance burners! Until last year, I wasn't really familiar with how these worked or even what they were.

To anyone just trying fragrance burners for the first time, here's an easy description. Fragrance burners are the tool you need in order to use fragrance oils and waxes. They will all provide a spot for your fragrance- you can simply place your wax cube, wax tart, or oil into the top area. Then, you'll light a tea candle underneath the fragrance. The bottom area of the burner will provide a big space where you can place the tea candle. You can also buy huge bags of tea candles for around $5. The big bags last a long time.


By lighting the tea candle, the candle will provide heat that stimulates the fragrance oils or melts the fragrance wax cubes. Once heated, you will start to smell the fragrance throughout your home.

Some fragrance burners also have nice designs. When they are lit and your lights are dim, they cast a nice shadow and look awesome.

These photos are of my main burners that I use. I bought one at a big chain store. I bought the other at a small mom-and-pop store locally. Both are great!


Look with the lights dimmed.

Thursday, April 19, 2012

Pretty in Purple

Check out these purple flowers! I love how 3 shades of purple were included together- the dark purple, the lavender, and the mauve. They also smell so pretty.


I got them at Stop'N'Shop which is really becoming my favorite flower spot. They have a huge selection. How pretty are these flowers?

Tuesday, April 17, 2012

Vanilla Cupcake

Vanilla Cupcake scented fragrance oil by Yankee Candles sounds really yummy and smells equally yummy when you sniff the top of the container, but once used, left me a little disappointed.  The description provided says it is a "rich, creamy aroma" ... "with hints of lemon and lots of buttery icing."  Although the oil was pleasant, I really didn't grasp any buttery or creamy scents. I also found that I had to be standing pretty close to my oil burner in order to smell this one. I even put it in two separate burners to try to promote the scent.  I prefer scents that fill the area and overwhelm your senses a bit, which this did not do.  That being said, I still think this scent was good! I asked my boyfriend what fragrance he thought I was burning and he guessed citrus.... when I told him it was vanilla cupcake he suddenly seemed to agree with the name- so maybe it does accurately smell like vanilla cupcake. It just didn't to me! I was hoping my home would smell like a kitchen with some warm cupcakes in the oven.

Sunday, April 15, 2012

Nail Stencils

I've never done DIY nail stencils before, but just tried out Kiss Nail Artist Paint & Stencil Kit. Whomp, whomp- this seems cool but looked pretty horrible when I tried it! I do think if you use each stencil only once, then it can give you a great look. But that wasn't what I was going for when I tried it.

The Kiss Nail Artist Paint & Stencil Kit was under $10 at Walgreens. When I tried this, I wanted each nail to have a stencil design.
(Some people probably only put a stencil design on the ring finger.) The kit comes with two sheets of different stencil designs. Some are lines, shapes, swirls, or flowers. However, each design is only provided once. Each stencil has a little tab on the end to help with executing the look. The kit also comes with 3 nail polishes that have thin brushes, rather than the typical brush applicator.

First, I painted my basecoat color with OPI 'Feelin' Hot-Hot-Hot.'
After my nails dried, I placed a stencil on one nail. I had to press it down to stick onto my nail and it's basically like a sticker. Then, I took the white polish and painted on top of the stencil. Then, I pulled off the stencil using the tab provided. I figured pulling it off before it dried would make most sense.

After stenciling my ring fingers, I realized my stencil was falling apart. It's really thin and basically just paper so the polish started wearing away at the stencil itself. After doing two nails, I realized this stencil had seen its day. I had to move on. So, for my other fingers, I tried another stencil. Since I stuck to one stencil for the rest, each nail got messier and messier. You can tell from my pictures which nails were done first and which were done last. The last nails are so messy and horrible because the stencil really just couldn't be used at that point!
First nail: Looking fine.
Last nail: Looking horrible!
Check out the first nail in comparison to the last nail. I should say clean cut verses messy!


All in all, I did a pretty horrible job with The Kiss Nail Artist Paint & Stencil Kit. What I would suggest to other users trying this out is to only use each stencil one time on one nail. Here was my end result:

Saturday, April 14, 2012

Tri-Color Treat

For lunch, I usually take a sandwich that I make at home. It's so boring! I struggle to come up with ideas for lunch that make sense to pack and bring, but that also taste good. My friend suggested this great idea to me- and it was a success!

Cook a box of Tri-Color Pasta
Mix in:
black olives, each cut twice
lots of mozzerrella, cut into tiny squares
chopped red peppers
chopped cucumbers (very tiny)
vinergarette or Italian salad dressing (I used vinergarette)
Add:
pepper and salt to your liking


After I mixed everything together (I just used my clean hands, rather than any utensil), I separated out the finished batch into little tubberware containers. I stacked the packed containers in my refridgerator. Everything was set for the whole week!
Any other lunch ideas? I still need way more lunch-at-work ideas. I don't want to go back to the sandwich!

Friday, April 13, 2012

Lady In Red

I bought these red flowers for my kitchen. I thought it'd be nice to have some color in my kitchen, plus I figured the flowers would help to neutralize odors! I also have a red seat cushion and a painting on the wall with red matting and details, so everything matches.


I also took a photo of a red flower from last week too. Check out the beautiful yellow and black center: